Follow Me On Social Media!

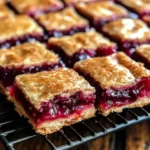
If you’re a fan of cherry pie but want something that’s quicker, easier, and just as delicious, these homemade Cherry Pie Bars are your answer. Imagine layers of buttery crust, a gooey cherry filling bursting with flavor, and a crumbly topping that practically melts in your mouth. Whether you’re prepping a dessert for a potluck, holiday gathering, or just an indulgent afternoon snack, these bars are guaranteed to impress.
What makes these a standout treat? For starters, they offer all the beloved elements of a classic cherry pie without the hassle of assembling and rolling out dough. Plus, the handheld format is perfect for sharing—or not! Keep reading, and we’ll show you exactly how to make your own homemade Cherry Pie Bars step-by-step.
Trust us, one bite and you’ll wonder why you’ve been making regular pies all this time.
Why You’ll Love This Recipe
Whether you’re a seasoned baker or just testing the waters, these homemade Cherry Pie Bars are about to become your new go-to dessert. Here’s why:
- Easy to Make: There’s no rolling dough or fancy equipment needed. The buttery crust doubles as the crumble topping, saving you time and effort.
- Perfect for Any Occasion: Ideal for everything from casual snacks to formal events like holidays or potlucks.
- Customizable: Use fresh, frozen, or even canned cherries—this recipe is as versatile as your pantry allows.
- Better Than Store-Bought: Completely free from preservatives, these bars use fresh ingredients for the best flavor possible.
If you’ve been searching for a dessert that’s both foolproof and impressive, you’re in for a treat!
Ingredients You’ll Need
Here’s what you’ll need to create the ultimate Cherry Pie Bars:
For the Crust & Topping:
- 1 cup (2 sticks) unsalted butter, softened
- 1 cup granulated sugar
- 2 ½ cups all-purpose flour
- ½ teaspoon baking powder
- ¼ teaspoon salt
- 2 large eggs
- 1 teaspoon vanilla extract
For the Cherry Filling:
- 4 cups fresh or canned cherries (pitted)
- ¾ cup sugar
- 2 tablespoons cornstarch
- 1 tablespoon lemon juice
- ½ teaspoon almond extract (optional)
Simple ingredients, yet they come together to create layers of flavor that taste like pure comfort.
Step-by-Step Instructions
1. Preheat the Oven
Set your oven to 350°F (175°C). While it warms up, prepare a 9×13-inch baking pan by lining it with parchment paper for easy removal.
2. Prepare the Crust & Topping
- Beat together the softened butter and sugar until smooth and creamy.
- Add in the eggs and vanilla extract, mixing until fully combined.
- Gradually mix in the flour, baking powder, and salt. The dough will be thick.
- Press half of this dough into the bottom of your prepared pan to form the crust. Reserve the other half for the crumble topping.
3. Make the Cherry Filling
- Combine the cherries, sugar, cornstarch, and lemon juice in a saucepan over medium heat.
- Cook until the cherries release their juices and the mixture thickens, about 5-7 minutes. Stir frequently to avoid burning.
- For an extra burst of flavor, stir in the almond extract once off the heat.
4. Assemble the Bars
- Spread the cherry filling evenly over the crust.
- Crumble the reserved dough on top. Don’t worry about perfection—the uneven texture adds to the rustic charm!
5. Bake to Perfection
- Bake for 35-40 minutes, or until the top is a light golden brown.
- Remove from the oven and allow the bars to cool completely before slicing into squares.
Pro Tip:
For cleaner cuts, refrigerate the bars for at least an hour before slicing. It’s worth the wait!
Pro Tips for the Best Homemade Cherry Pie Bars
Want to take your Cherry Pie Bars to the next level? Here are some handy tips:
- Boost the Flavor: Add a splash of almond extract to the cherry filling for a nutty undertone that pairs beautifully with the fruit.
- Chill Before Cutting: Refrigerating the bars before slicing not only makes cleaner cuts but also enhances the texture.
- Experiment with Fruits: This recipe works wonderfully with other berries like blueberries, raspberries, or even peaches!
- Use a Food Processor: For an even quicker crust and crumble, mix the dough using a food processor.
Storage & Freezing Instructions
If you somehow manage to have leftovers, here’s how to store them:
- At Room Temperature: Store in an airtight container for up to 2 days.
- Refrigerator: Keep in an airtight container for up to a week.
- Freezer: Wrap bars individually in plastic wrap, then place them in a freezer bag. Freeze for up to 3 months. Thaw overnight in the fridge before serving.
Frequently Asked Questions
Can I use cherry pie filling instead of fresh cherries?
Absolutely! Just reduce the sugar in the recipe to avoid an overly sweet filling.
How do I make this recipe gluten-free?
Swap out the all-purpose flour for a 1-to-1 gluten-free flour blend. The texture may vary slightly but will still be delicious.
Can I add a glaze on top?
Yes! A simple powdered sugar glaze made with milk and vanilla extract is a perfect finishing touch.
Make These Cherry Pie Bars Today!
These Cherry Pie Bars are everything you want in a dessert—easy, buttery, and downright irresistible. Perfect for any occasion, these bars offer a fun twist on the traditional cherry pie, making them perfect for both novice and experienced bakers.
If you make these, we’d love to hear about it! Leave a comment below, or tag us on Instagram or Facebook with your creations. And if you’re looking for more cherry-inspired desserts, don’t miss our Easy Cherry Cobbler Recipe or Cherry Crumble Tarts—links below!
Now, it’s time to hit the kitchen. Happy baking!
Why You’ll Love This Recipe
There’s something magical about recipes that strike the perfect balance between simplicity and indulgence, and these Cherry Pie Bars do just that. Here’s why this dessert is a must-try:
- Family-Friendly: These bars are a hit with kids and adults alike, making them an ideal choice for family gatherings.
- Budget-Friendly: Using pantry staples and fresh or canned cherries, this recipe won’t break the bank.
- Great for Gifting: Pack these bars in decorative tins or boxes for a thoughtful homemade gift during the holidays or special occasions.
Pairing Suggestions
To elevate your dessert experience, consider pairing these Cherry Pie Bars with:
- Vanilla Ice Cream: The creamy sweetness of vanilla ice cream complements the tangy cherry filling perfectly.
- Whipped Cream: A dollop of lightly sweetened whipped cream adds a touch of elegance.
- Coffee or Tea: The buttery crust and sweet filling are delightful alongside a hot cup of coffee or tea.
Whether enjoyed as an afternoon snack, a party treat, or a late-night indulgence, these bars are guaranteed to be a crowd-pleaser.
Variations to Try
If you’re feeling adventurous or want to customize these Homemade Cherry Pie Bars, here are some fun variations to explore:
- Chocolate Cherry Bars: Add ½ cup of mini chocolate chips to the crumble topping for a rich, chocolatey twist.
- Nutty Delight: Sprinkle chopped walnuts, pecans, or almonds over the cherry filling before adding the crumble for a nutty crunch.
- Coconut Lover’s Dream: Mix shredded coconut into the crumble topping for a tropical flair.
- Citrus Kick: Add a teaspoon of orange or lime zest to the cherry filling for a bright, zesty flavor boost.
- Spiced Cherry Bars: A pinch of cinnamon or nutmeg in the filling can add a warm, spiced depth to the fruity sweetness.
Don’t be afraid to experiment—these bars are incredibly versatile and can be adapted to suit your preferences or the ingredients you have on hand.
Serving Tips
For an extra special presentation, try these serving ideas:
- Drizzle with Glaze: After the bars cool, drizzle a sweet glaze made with powdered sugar and milk over the top for a bakery-style finish.
- Top with Fresh Cherries: For a pop of color and freshness, garnish each bar with a single fresh cherry or a few cherry halves.
- Serve Warm: While these bars are delicious at room temperature, serving them slightly warmed with a scoop of vanilla ice cream can turn them into a decadent dessert.
Whether you dress them up for a dinner party or keep it simple for a weekday treat, these Cherry Pie Bars are sure to shine!